Step-by-Step Installation Guide: Perfecting Your French Curl Braids at Home
French Curl Braids and Preparation
French curl braids are a timeless and elegant hairstyle that has been embraced by many for its versatility and beauty. This intricate braiding technique combines the sophistication of French braids with the playful curls that add a touch of glamour. Whether you are preparing for a special occasion or simply want to elevate your everyday look, mastering the art of French curl braids at home can be a rewarding experience. This step-by-step guide will walk you through the entire process, from preparation to the final touches, ensuring that you achieve flawless results.
Understanding French Curl Braids
French curl braids are a variation of traditional French braids, where the hair is intricately woven close to the scalp, and the ends are curled to create a soft, romantic finish. This style is perfect for those who want a polished yet feminine look. The braids can be styled in various ways, such as a single braid down the back, twin braids, or even incorporated into updos. The versatility of French curl braids makes them suitable for different hair types and lengths, although longer hair tends to yield more dramatic results.
Benefits of French Curl Braids
One of the main advantages of French curl braids is their durability. When done correctly, this hairstyle can last for several days, making it ideal for busy individuals who want a low-maintenance yet stylish look. Additionally, French curl braids are a protective style that helps to minimize hair damage by reducing the need for daily styling and heat tools. The braids also provide a great way to showcase creativity, as they can be accessorized with beads, ribbons, or other decorative elements.
Preparing Your Hair for Braiding
Before diving into the braiding process, it is crucial to prepare your hair properly. Start by washing your hair with a gentle shampoo and conditioner to ensure that it is clean and free of any product buildup. Clean hair is easier to work with and will hold the braids better. After washing, apply a leave-in conditioner or detangling spray to make the hair more manageable. This step is especially important for those with thick or curly hair, as it helps to reduce tangles and breakage during the braiding process.
Gathering the Necessary Tools and Products
To achieve perfect French curl braids, you will need a few essential tools and products. These include a wide-tooth comb for detangling, a rat-tail comb for parting the hair, hair elastics to secure the braids, and bobby pins for any additional styling. You will also need a curling iron or flexi rods to create the curls at the ends of the braids. Additionally, consider using a lightweight hair oil or serum to add shine and reduce frizz. Having all these tools and products ready before you start will make the process smoother and more efficient.
Creating the Right Environment
Braiding your hair at home requires a comfortable and well-lit environment. Choose a space where you can sit for an extended period without distractions. A mirror is essential to help you see the back of your head as you braid. If possible, use a handheld mirror or a three-way mirror to get a better view. Good lighting is also important to ensure that you can see every detail as you work. Some people find it helpful to play calming music or set up a relaxing atmosphere to make the experience more enjoyable.
Mental Preparation and Patience
Braiding your hair, especially a complex style like French curl braids, requires patience and focus. It is important to approach the process with a positive mindset and understand that it may take some time to get it right, especially if you are a beginner. Do not rush through the steps; take your time to ensure that each section is neatly braided. Remember that practice makes perfect, and with each attempt, you will become more skilled and confident in your braiding abilities.
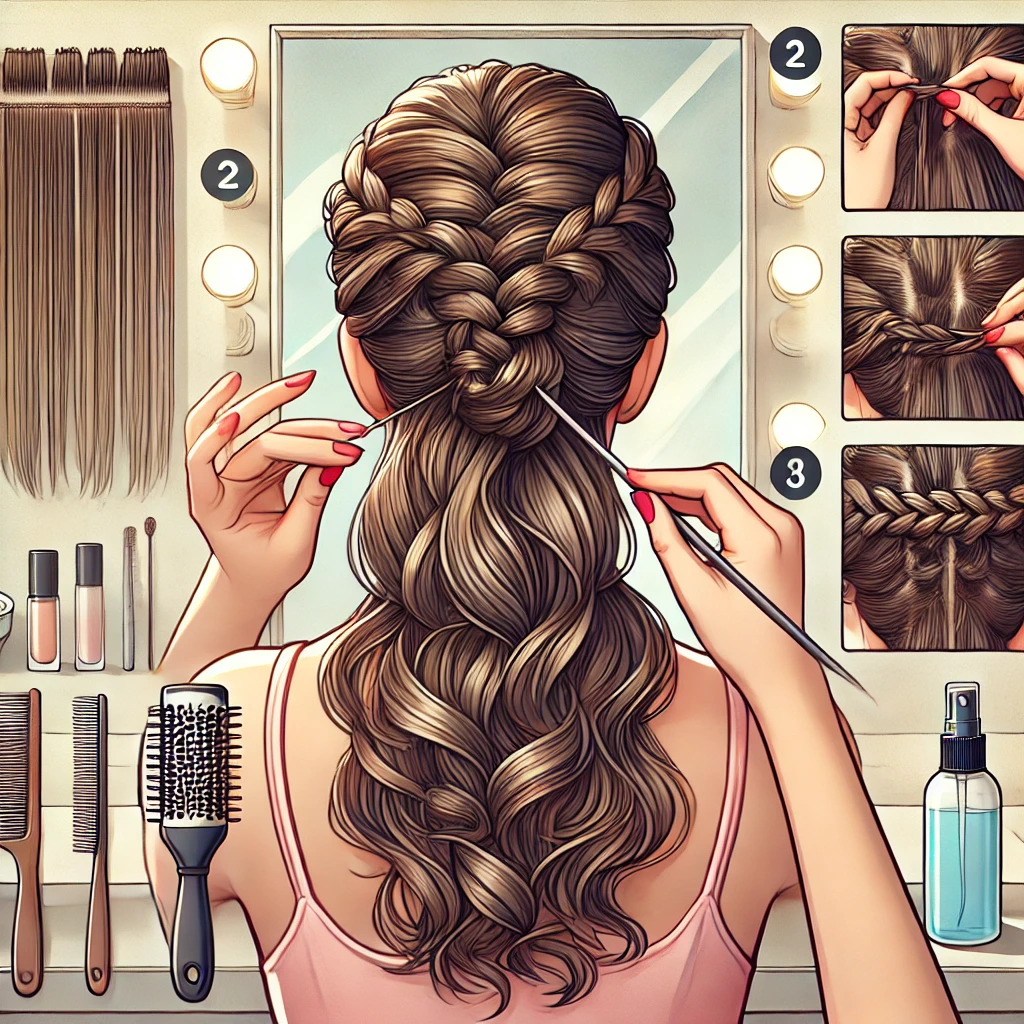
Sectioning and Braiding the Hair
Once the hair is prepped and all the necessary tools are gathered, the next step is to section the hair and begin the braiding process. This part of the guide will focus on how to divide the hair into manageable sections and how to create the foundation of the French curl braids. Proper sectioning is crucial for achieving a neat and symmetrical look, so take your time with this step.
Dividing the Hair into Sections
Start by using a rat-tail comb to create a clean part down the center of the scalp, dividing the hair into two equal sections. This will serve as the foundation for twin French curl braids. If you prefer a single braid, you can skip this step and work with the entire head of hair as one section. For those opting for twin braids, secure one section with a hair elastic or clip to keep it out of the way while you work on the other side.
Next, decide where you want the braids to start. For a classic look, begin at the crown of the head. Use the rat-tail comb to create a small, horizontal section at the crown. This will be the first section to be braided. As you work, you will gradually add more hair to the braid, creating the signature French braid look. It is important to keep the sections even and consistent to ensure that the braids look uniform.
Starting the French Braid
To start the French braid, take the small section of hair at the crown and divide it into three equal strands. Begin braiding by crossing the right strand over the middle strand, then the left strand over the new middle strand. This is the basic three-strand braid technique. After the first crossover, it is time to start incorporating additional hair into the braid.
As you continue braiding, use your free hand to gather a small section of hair from the side of the head and add it to the outer strand before crossing it over the middle. Repeat this process on both sides, alternating between the right and left strands. The key to a neat French braid is to keep the tension even and to ensure that the added sections are of equal size. This will create a smooth and cohesive braid that lies flat against the scalp.
Maintaining Consistent Tension
One of the most challenging aspects of French braiding is maintaining consistent tension throughout the process. If the braid is too tight, it can cause discomfort and even lead to hair breakage. On the other hand, if the braid is too loose, it may not hold well and could unravel easily. To achieve the perfect tension, practice applying gentle but firm pressure as you braid. It may take a few tries to get it right, but with practice, you will develop a feel for the right amount of tension.
Working Down the Scalp
Continue braiding down the scalp, adding small sections of hair to each outer strand as you go. As you approach the nape of the neck, you may find it helpful to tilt your head forward slightly to make the braiding process easier. Once you have incorporated all the hair into the braid, continue with a regular three-strand braid until you reach the ends of the hair. Secure the braid with a hair elastic. Repeat the same process on the other side if you are creating twin braids.
Tips for Neat and Even Braids
To ensure that your French curl braids look polished and professional, there are a few tips to keep in mind. First, make sure that the sections of hair you add to the braid are of equal size. This will create a symmetrical and balanced look. Second, avoid pulling too hard on the hair, as this can cause discomfort and lead to uneven braids. Finally, take your time and work slowly, especially if you are new to French braiding. Rushing through the process can result in messy braids that do not hold well.
Curling the Ends and Styling
With the braiding complete, the next step is to add the curls that give French curl braids their distinctive look. This part of the guide will cover how to curl the ends of the braids and how to style them for a finished look. The curling process is relatively simple but requires attention to detail to ensure that the curls are even and long-lasting.
Preparing the Ends for Curling
Before curling, it is important to prepare the ends of the braids to ensure that the curls hold well. Start by gently brushing out the ends of the braids to remove any tangles. This will make it easier to wrap the hair around the curling iron or flexi rods. If the ends are particularly dry or damaged, consider applying a small amount of heat protectant or styling cream to protect the hair from heat damage and to add shine.
Choosing the Right Curling Tool
There are several tools you can use to curl the ends of your French curl braids, including curling irons, wand curlers, and flexi rods. Each tool has its own advantages, so choose the one that you are most comfortable with. Curling irons and wand curlers are great for creating defined, bouncy curls, while flexi rods are ideal for achieving softer, more natural-looking curls. Whichever tool you choose, make sure that it is set to the appropriate heat setting for your hair type to avoid damage.
Curling with a Curling Iron or Wand
If you are using a curling iron or wand, start by dividing the end of the braid into smaller sections. The size of the sections will determine the size of the curls. For tighter curls, use smaller sections; for looser waves, use larger sections. Wrap each section around the curling iron or wand, holding it in place for a few seconds before releasing. Be careful not to hold the iron on the hair for too long, as this can cause heat damage. Once all the sections are curled, gently run your fingers through the curls to loosen them slightly and create a more natural look.
Curling with Flexi Rods
For those who prefer a heat-free option, flexi rods are an excellent choice. To use flexi rods, start by dampening the ends of the braids with water or a styling spray. This will help the curls to set better. Take a small section of the braid and wrap it around the flexi rod, starting at the end and rolling upwards towards the base of the braid. Secure the rod in place by bending it into a U-shape. Repeat this process for the entire braid, then allow the hair to air dry or use a hooded dryer to speed up the process. Once the hair is completely dry, carefully remove the flexi rods to reveal soft, bouncy curls.
Setting the Curls
To ensure that the curls last as long as possible, it is important to set them properly. After curling, apply a light-hold hairspray to the ends of the braids. This will help to lock in the curls and prevent them from falling out too quickly. Avoid using too much product, as this can weigh down the hair and make the curls look stiff. For added longevity, consider wrapping the curled ends in a silk or satin scarf overnight to help maintain the shape of the curls.
Styling the Braids
Once the curls are set, you can style the braids in various ways to suit your preference. For a classic look, leave the braids loose and let the curls cascade down your back. If you prefer a more polished look, you can twist the braids into a bun or updo, securing them with bobby pins. Another option is to accessorize the braids with decorative pins, beads, or ribbons for a more personalized touch. The versatility of French curl braids allows for endless styling possibilities, so feel free to experiment and find a look that suits you.
Maintenance and Final Thoughts
After putting in the effort to create beautiful French curl braids, it is important to maintain them properly to ensure that they last as long as possible. This final part of the guide will cover how to care for your braids, how to refresh the curls, and some final tips for perfecting your French curl braids at home.
Caring for Your Braids
To keep your French curl braids looking fresh, it is important to take care of them on a daily basis. At night, wrap your hair in a silk or satin scarf or use a silk pillowcase to prevent friction and reduce frizz. This will help to maintain the smoothness of the braids and keep the curls intact. Avoid using heavy oils or products on the braids, as this can cause buildup and make the hair look greasy. Instead, opt for a lightweight serum or oil to add shine and reduce frizz.
Refreshing the Curls
Over time, the curls at the ends of the braids may start to loosen or lose their shape. To refresh the curls, you can use a curling iron or wand to touch up the ends. Alternatively, you can dampen the ends with water or a styling spray and re-roll them onto flexi rods. Allow the hair to dry completely before removing the rods. This will help to revive the curls and keep the braids looking fresh.
Avoiding Common Mistakes
While French curl braids are a relatively low-maintenance style, there are a few common mistakes to avoid. One of the most common mistakes is braiding the hair too tightly, which can cause discomfort and lead to hair breakage. To prevent this, make sure to maintain even tension throughout the braiding process. Another mistake is using too much product, which can weigh down the hair and make the braids look greasy. Use products sparingly and focus on lightweight formulas that add shine without buildup.
Final Tips for Perfect French Curl Braids
To achieve the best results with your French curl braids, it is important to practice and be patient. Do not be discouraged if your first few attempts are not perfect; braiding is a skill that improves with time and practice. Additionally, make sure to take care of your hair before and after braiding to keep it healthy and strong. Regular trims, deep conditioning treatments, and protective styles like French curl braids can help to maintain the health and beauty of your hair.
French curl braids are a stunning and versatile hairstyle that can be achieved at home with a little practice and patience. By following this step-by-step guide, you can master the art of French curl braids and enjoy a beautiful, long-lasting style that is perfect for any occasion. From preparation to braiding, curling, and maintenance, each step plays a crucial role in achieving flawless results. With the right tools, techniques, and care, you can perfect your French curl braids and showcase your creativity and style. So, gather your tools, set aside some time, and embark on the journey to creating your own gorgeous French curl braids at home.