Mastering the Art of Drawing Curly Cartoon Hair: A Step-by-Step Guide
Understanding the Basics of Curly Cartoon Hair
The Importance of Curly Hair in Cartoon Art
Curly hair is a dynamic and expressive feature that can bring life and personality to cartoon characters. Unlike straight hair, which often appears sleek and uniform, curly hair has a unique texture and volume that can convey a wide range of emotions and traits. For instance, tight curls might suggest a playful or energetic personality, while loose waves could imply a more relaxed or carefree nature. Understanding how to draw curly hair effectively is essential for any aspiring cartoonist who wants to create memorable and relatable characters.
The Anatomy of Curly Hair
Before diving into the drawing process, it is crucial to understand the basic structure of curly hair. Curly hair is characterized by its spiral or coiled shape, which creates a three-dimensional effect. Each curl is made up of a series of loops that overlap and interact with one another, forming a complex pattern. This complexity is what makes curly hair both challenging and rewarding to draw.
In cartoon art, curly hair is often exaggerated to emphasize its texture and volume. This exaggeration helps to create a more stylized and visually appealing look. However, it is important to strike a balance between exaggeration and realism to ensure that the hair looks believable and fits seamlessly with the rest of the character’s design.
Tools and Materials for Drawing Curly Hair
To begin drawing curly cartoon hair, one must first gather the necessary tools and materials. Traditional artists may prefer using pencils, erasers, and paper, while digital artists might opt for a drawing tablet and software like Adobe Photoshop or Procreate. Regardless of the medium, having the right tools is essential for achieving the desired results.
Pencils with varying degrees of hardness (e.g., HB, 2B, 4B) are useful for creating different line weights and shading effects. Erasers, both kneaded and precision, are indispensable for correcting mistakes and refining details. For digital artists, a stylus with pressure sensitivity can mimic the feel of traditional drawing tools and provide greater control over line thickness and opacity.
Observing Real-Life References
One of the best ways to improve one’s ability to draw curly hair is by studying real-life references. Observing how curls behave in different lighting conditions, angles, and styles can provide valuable insights into their structure and movement. Photographs, videos, and even live models can serve as excellent references for understanding the nuances of curly hair.
When studying references, pay close attention to the way curls interact with one another. Notice how some curls may overlap or twist around each other, creating a sense of depth and volume. Additionally, observe how light and shadow play across the surface of the hair, highlighting its texture and adding dimension.
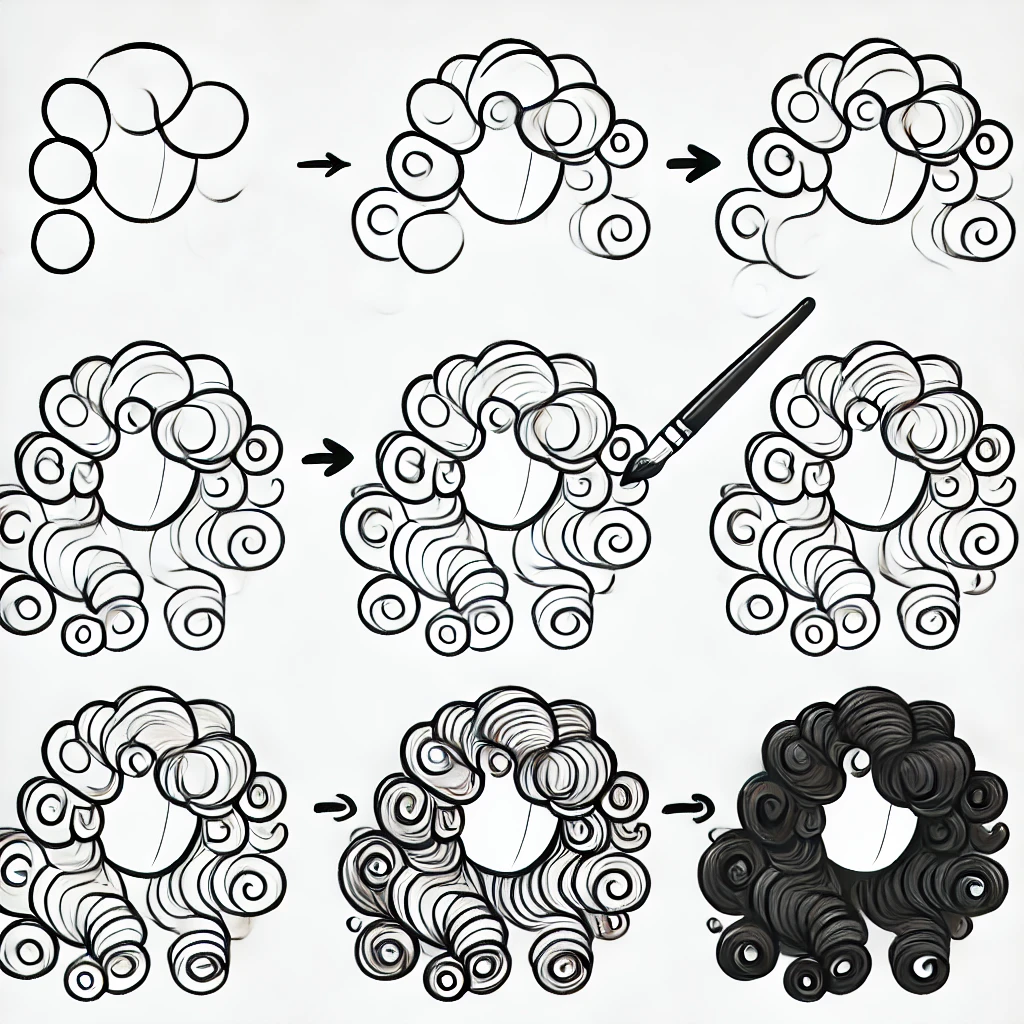
Sketching the Basic Shape
The first step in drawing curly cartoon hair is to sketch the basic shape of the hairstyle. This involves outlining the overall silhouette of the hair, taking into account its volume and flow. For example, if the character has a large, voluminous afro, the initial sketch should reflect this by drawing a rounded, cloud-like shape.
It is important to keep the sketch loose and fluid at this stage, as it allows for greater flexibility and experimentation. Avoid getting bogged down by details; instead, focus on capturing the general shape and movement of the hair. Once the basic shape is established, the artist can begin to refine the sketch by adding more defined curls and details.
Adding Volume and Texture
After sketching the basic shape, the next step is to add volume and texture to the hair. This is where the artist begins to define the individual curls and their arrangement. Start by drawing larger, more prominent curls that serve as the foundation of the hairstyle. These curls should follow the natural flow of the hair and create a sense of movement.
Once the larger curls are in place, the artist can begin to add smaller, secondary curls that fill in the gaps and add complexity to the hairstyle. These smaller curls should be drawn with varying degrees of tightness and direction to create a more dynamic and realistic look.
Shading and Highlighting
Shading and highlighting are essential for adding depth and dimension to curly hair. By carefully applying light and shadow, the artist can emphasize the texture and volume of the curls, making them appear more three-dimensional.
Start by identifying the light source and determining where the highlights and shadows will fall. Highlights should be placed on the areas of the hair that catch the most light, such as the tops of the curls. Shadows, on the other hand, should be applied to the areas that are less exposed to light, such as the undersides of the curls and the spaces between them.
Use a combination of hatching, cross-hatching, and blending techniques to create smooth transitions between light and shadow. For digital artists, layer blending modes and opacity adjustments can be used to achieve similar effects.
Refining the Details
The final step in drawing curly cartoon hair is to refine the details and add any finishing touches. This involves cleaning up the sketch, erasing any unnecessary lines, and adding finer details such as stray hairs or flyaways. These small details can make a significant difference in the overall appearance of the hair, adding a sense of realism and personality to the character.
Additionally, the artist may choose to add color to the hair at this stage. When coloring curly hair, it is important to consider the way light interacts with the curls and how this affects the color. For example, highlights may appear brighter and more saturated, while shadows may appear darker and more muted.
Mastering the art of drawing curly cartoon hair requires a combination of observation, practice, and attention to detail. By understanding the basic structure of curly hair, gathering the right tools, and studying real-life references, artists can develop the skills needed to create dynamic and expressive hairstyles. In the next part of this guide, we will explore advanced techniques for drawing curly hair, including how to create different curl patterns and styles.
Advanced Techniques for Drawing Curly Cartoon Hair
Exploring Different Curl Patterns
Curly hair comes in a variety of patterns, each with its own unique characteristics. Understanding these patterns is essential for creating diverse and realistic hairstyles. Some common curl patterns include loose waves, tight coils, and everything in between.
Loose waves are characterized by their gentle, flowing curves. They tend to have a more relaxed and natural appearance, making them ideal for characters with a laid-back or carefree personality. To draw loose waves, focus on creating smooth, flowing lines that follow the natural movement of the hair.
Tight coils, on the other hand, are more compact and springy. They create a sense of energy and playfulness, making them perfect for characters with a lively or mischievous nature. Drawing tight coils requires careful attention to detail, as each curl must be tightly wound and evenly spaced.
Creating Volume and Movement
One of the key challenges in drawing curly hair is capturing its volume and movement. Unlike straight hair, which tends to fall flat, curly hair has a natural bounce and lift that must be conveyed in the drawing.
To create volume, start by drawing the hair in layers. The bottom layer should be the largest and most voluminous, with each subsequent layer becoming progressively smaller. This layering technique helps to build up the hair’s overall shape and gives it a sense of depth.
Movement can be achieved by varying the direction and flow of the curls. For example, some curls may twist to the left, while others twist to the right. This variation creates a more dynamic and natural look, as real hair rarely falls in a uniform pattern.
Adding Texture and Detail
Texture is what brings curly hair to life, and adding it requires a keen eye for detail. Start by defining the individual curls, paying close attention to their shape and size. Each curl should be distinct, with its own unique twist and turn.
Once the curls are defined, add smaller details such as flyaways and split ends. These imperfections are what make the hair look real and relatable. Flyaways can be drawn as thin, wispy strands that escape from the main body of the hair, while split ends can be represented by small, jagged lines at the tips of the curls.
Shading and Highlighting Techniques
Shading and highlighting are crucial for adding depth and dimension to curly hair. The key is to use light and shadow to emphasize the hair’s texture and volume.
Start by identifying the light source and determining where the highlights and shadows will fall. Highlights should be placed on the areas of the hair that catch the most light, such as the tops of the curls. Shadows, on the other hand, should be applied to the areas that are less exposed to light, such as the undersides of the curls and the spaces between them.
Use a combination of hatching, cross-hatching, and blending techniques to create smooth transitions between light and shadow. For digital artists, layer blending modes and opacity adjustments can be used to achieve similar effects.
Experimenting with Different Styles
Curly hair can be styled in countless ways, each with its own unique look and feel. Experimenting with different styles is a great way to expand one’s repertoire and develop a more versatile skill set.
Some popular curly hairstyles include afros, braids, and updos. Afros are characterized by their large, rounded shape and dense curls. They are a bold and iconic style that can add a lot of personality to a character.
Braids, on the other hand, are a more intricate and detailed style. They involve weaving the hair into tight, interlocking patterns, creating a complex and visually interesting look. Updos are another versatile option, allowing the artist to experiment with different shapes and arrangements.
Drawing curly cartoon hair is a complex and rewarding process that requires a combination of technical skill and artistic intuition. By exploring different curl patterns, creating volume and movement, and adding texture and detail, artists can bring their characters to life with dynamic and expressive hairstyles. In the next part of this guide, we will delve into the world of color and how it can be used to enhance curly hair.
The Role of Color in Drawing Curly Cartoon Hair
Understanding Color Theory
Color plays a crucial role in bringing curly hair to life. Understanding the basics of color theory is essential for creating realistic and visually appealing hairstyles. Color theory involves the study of how colors interact with one another and how they can be combined to create different effects.
The color wheel is a fundamental tool in color theory, consisting of primary, secondary, and tertiary colors. Primary colors (red, blue, and yellow) cannot be created by mixing other colors, while secondary colors (green, orange, and purple) are formed by combining two primary colors. Tertiary colors are created by mixing a primary color with a secondary color.
Choosing the Right Color Palette
When selecting a color palette for curly hair, it is important to consider the character’s overall design and personality. The hair color should complement the character’s skin tone, clothing, and other features.
For example, warm colors like red, orange, and yellow can create a vibrant and energetic look, while cool colors like blue, green, and purple can convey a more calm and serene vibe. Neutral colors like brown, black, and gray are versatile and can be used to create a more natural and understated appearance.
Adding Depth with Highlights and Shadows
Highlights and shadows are essential for adding depth and dimension to curly hair. By carefully applying light and shadow, the artist can emphasize the hair’s texture and volume, making it appear more three-dimensional.
Start by identifying the light source and determining where the highlights and shadows will fall. Highlights should be placed on the areas of the hair that catch the most light, such as the tops of the curls. Shadows, on the other hand, should be applied to the areas that are less exposed to light, such as the undersides of the curls and the spaces between them.
Use a combination of hatching, cross-hatching, and blending techniques to create smooth transitions between light and shadow. For digital artists, layer blending modes and opacity adjustments can be used to achieve similar effects.
Experimenting with Different Color Techniques
There are several techniques that can be used to add color to curly hair, each with its own unique look and feel. Some popular techniques include flat coloring, gradient coloring, and textured coloring.
Flat coloring involves applying a single, solid color to the hair. This technique is simple and straightforward, making it ideal for beginners. However, it can lack depth and dimension, so it is often combined with shading and highlighting techniques.
Gradient coloring involves blending two or more colors together to create a smooth transition. This technique can add a sense of depth and movement to the hair, making it appear more dynamic and lifelike.
Textured coloring involves adding patterns or textures to the hair, such as streaks, highlights, or lowlights. This technique can create a more complex and visually interesting look, adding a sense of realism and personality to the character.
Color is a powerful tool that can be used to enhance the appearance of curly hair. By understanding color theory, choosing the right color palette, and experimenting with different techniques, artists can create vibrant and expressive hairstyles that bring their characters to life. In the final part of this guide, we will explore how to incorporate curly hair into different character designs and settings.
Incorporating Curly Hair into Character Designs
Matching Hair to Character Personality
The hairstyle of a character can say a lot about their personality and background. When designing a character with curly hair, it is important to consider how the hair reflects their traits and story.
For example, a character with tight, bouncy curls might be portrayed as energetic and playful, while a character with loose, flowing waves might be seen as calm and relaxed. The volume and style of the hair can also convey a sense of confidence, creativity, or even rebellion.
Adapting Hair to Different Settings
The setting of a story can also influence the design of a character’s hair. For instance, a character in a fantasy world might have elaborate, magical curls that defy gravity, while a character in a realistic setting might have more natural, everyday curls.
Consider how the environment and context of the story affect the character’s hair. In a windy setting, the hair might be drawn with more movement and flow, while in a humid environment, the curls might appear more defined and springy.
Creating Unique and Memorable Characters
One of the joys of drawing curly hair is the opportunity to create unique and memorable characters. By experimenting with different curl patterns, styles, and colors, artists can develop a wide range of characters that stand out and leave a lasting impression.
Don’t be afraid to push the boundaries and try new things. Curly hair offers endless possibilities for creativity and expression, so embrace the challenge and have fun with it.
Incorporating curly hair into character designs is a rewarding and creative process. By matching the hair to the character’s personality, adapting it to different settings, and experimenting with unique styles, artists can create dynamic and memorable characters that resonate with audiences. With practice and dedication, anyone can master the art of drawing curly cartoon hair and bring their characters to life.